Understanding and Controlling Exposure
It is critically important to understand that very few digital sensors (with the possible exception of the dual-pixel Fuji sensors) have the ability to capture the entire range of light values that are present in a normal sunlit scene. In addition, camera auto exposure systems aren’t flawless, they determine exposure based on ASSUMPTIONS programmed into the metering logic. If these ASSUMPTIONS don’t match the actual shooting conditions, then the exposure will be wrong. In order to be a successful photographer you need to understand the limitations of your sensor, know how your metering system works, and take control of the exposure when the automatic exposure system can’t do the job.
Most camera exposure meters are calibrated so that a normal exposure is based on the amount of light needed to correctly expose a photographic scene with “average” tonality and contrast. However, not all scenes are “average,” and if they are not, then we need to know how to adjust the exposure to correctly render the scene. For example, most camera meters have no way of knowing that a snow scene should be white instead of gray, so they will set the exposure to render the snow as mid-tone (average) gray.
In addition, most camera meters today use a type of "matrix" or evaluative metering that is significantly influenced by the area under the active autofocus point. (After all, they assume that you are focusing on the "primary" subject, and therefore want to optimize exposure on this part of the scene.) Unfortunately this can result in images that are significantly over or under exposed if the area under the autofocus point is significantly darker or brighter than the rest of the scene.
Exposure adjustments are typically described in terms of “stops” of exposure adjustments, i.e., one stop over, ½ stop under, etc. A “stop” is a term used to describe a change in the amount of light hitting the sensor or film that is either twice as much light, or half the amount of light of your base value. You can adjust exposure +1 Stop by setting a shutter speed that is twice as long, (i.e. changing from 1/60 to 1/30 of a second) or by opening the lens diaphragm (aperture) to a setting that doubles the area of the lens opening, thus allowing twice as much light to hit the sensor.
So how do we know how much of an adjustment to make in order to “nail” the exposure? A VERY useful tool for understanding and controlling exposure is the Zone System as taught by Ansel Adams.
The Zone System: Very few digital sensors have the ability to capture the entire range of light values that are present in a normal sunlit scene. If a camera manufacturer follows the ISO standards for calibrating the output from their sensor, then there is a theoretical limit of just less than 3 stops above mid-tone before the sensor saturates at “pure white.” (Fuji sensors are an exception to this rule, since they use two photo-sensitive areas per pixel in order to extend the highlight range.)
The “zones” defined below segment the light levels in a typical sunlit scene into 10 regions. Since our digital camera can’t correctly record all 10 zones, we need to make a conscious decision on what tones in the scene we will expose to fall within the limited tonal range of our camera’s sensor.

Zone I Black without any texture
Zone II Black with slight suggestion of tonality
Zone III Darkest areas that still retains visible detail
Zone IV Average shadows in landscapes/portraits
Zone V Middle Gray - 18% gray card
Zone VI Average Caucasian skin
Zone VII Lightest areas that retain visible detail
Zone VIII White areas with slightly visible textures
Zone IX Glaring white surfaces - Highlights
Zone X A light source (maximum white)
To determine the correct
exposure for a scene set your camera to manual exposure and spot metering and:
· In a low contrast scene, spot meter on a mid tone (Zone V) area of the scene such as a middle blue patch of the north sky close to the horizon, a gray stone, weathered wood, a green lawn, etc. and adjust your exposure to “0” on your exposure scale.
· In a high contrast scene, select the brightest part of the scene where you want to maintain detail, such as a textured area of snow, then set your exposure so the exposure scale meters this area as Zone VII, or 2 stops above mid-tone
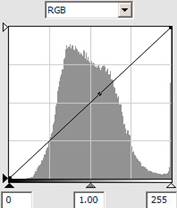
Reading the histogram:
· The histogram depicts the relative distribution of tones in an image, dark tones to the left, bright tones to the right
· Middle corresponds to Zone V or mid-tone
· The scale is NOT linear, with approximately 4 stops to the left of middle and 2.5 stops to the right.
· One grid below middle is roughly equivalent to -1 EV
· One grid above middle is roughly equivalent to +1 EV


|
Histogram of Under-Exposed Scene |
Histogram of Correctly Exposed Scene
|
Histogram of Over-Exposed Scene
|
The “spike” on the right side of the histogram of the overexposed scene indicates over-exposed areas that cannot be totally recovered in post processing. (These over-exposed highlights would also be indicated by “blinkies” on your LCD image review if you had this feature selected.) You should retake the picture using negative exposure compensation to recover these highlights, and then adjust the overall exposure of the image in post processing.
Rules of thumb for adjusting exposure using the histogram:
· Use the RGB histogram. The “composite” histogram and flashing highlights warning won’t necessarily warn you when you are clipping a single color channel.
· The histogram should just touch the right side of the scale. This maximizes the quality of the image data without clipping the highlights
·
If needed, lower your
exposure to preserve the highlights. (Don’t clip the image data on the
right of the histogram.
Remember that +2 EV is equivalent to Zone VII, the lightest areas in a scene
that retain visible detail)
Guidelines
for setting Shutter Speed:
A general guideline for preventing motion blur from camera movement is to use a
shutter speed at least as fast as the inverse of the effective focal length of
the lens. For example when using a lens with a focal length of 200mm on a
camera with an APS size sensor (1.5x focal length “multiplier”), you should use
a shutter speed of at least 1/300th of a second.
General guidelines for preventing motion blur are:
· Less than 1/30 second: Use a tripod and mirror pre-release
· 1/30 sec: minimum for handholding wide angle lens
· 1/60 sec: safe shutter speed for handholding normal lens
· 1/125 sec: Moderate action such as people walking
· 1/250 sec: Moderate fast action, runners at medium speed
· 1/500 sec: Fast runners, telephoto lenses, and wildlife
· 1/1000 sec: Fast action like racecars, track and field, birds
Using a faster shutter speed will require us to use a larger aperture in order to maintain the correct exposure, and we need to understand how this will affect our images. In addition to affecting the intensity of light hitting the sensor or film, aperture also affects depth of field.
Depth of Field: Depth of field is defined as a zone of acceptable sharpness within an image. There is always a plane within the image at which everything is in focus, and a zone around this plane where although the image is not perfectly focused it is still acceptably sharp. By selecting a smaller lens diaphragm opening you are in effect limiting the light to a smaller “cone angle” as it approaches the film/sensor plane. This will result in an image that appears to be in sharper focus than an image that is composed of light with a larger cone angle. So for a lens of any given focal length, a smaller aperture will result in a larger zone of acceptable sharpness, while a larger aperture will result in LESS depth of field.
There is one important caveat to this rule. When the lens opening becomes too small, a greater proportion of the light traveling through the diaphragm opening will be diffracted (bent) as it passes by the sharp edges of the aperture blades. This resulting diffraction will result in a larger cone angle, thereby making the image appear blurry when compared to an image with less diffraction. A general rule of thumb is to stick to an aperture of f11 or larger, unless you absolutely need more depth of field for your image to be successful.
The three factors that affect depth of field are aperture, camera to subject distance, and focal length of the lens. Depth of field diminishes as apertures get larger, focal lengths longer, and subject distances decrease. So if you wanted to blur out the background in an image, select a large aperture, a long focal length and get close to the subject. If you want to retain detail in the background, select a small aperture, wide angle lens and don’t get too close to your subject.
Hyperfocal Distance Chart: The most useful tool for determining depth of field is a hyperfocal distance chart. The chart shown below is for a digital SLR with an APS size sensor and provides hyperfocal distances for lens focal lengths from 18mm to 60mm. For any given focal length and aperture, the hyperfocal distance is defined as the focus distance at which everything from half of the hyperfocal distance out to infinity will be acceptably sharp in an 8x10 inch print. For example, if an 18mm lens set at an aperture of f11 is focused at the hyperfocal distance of 4.94 feet, everything from 2.47 feet (half of 4.94 feet) to infinity will be acceptably sharp.
We can see from the chart below that depth of field is drastically reduced as the lens focal length gets longer. For a 50mm lens set at the same f11 aperture and focused at the hyperfocal distance of 38.2 feet, depth of field is from 19.1 feet (half of 38.2 feet) to infinity, which is not sufficient to include everything in focus in a typical “scenic” picture. It is because of this relationship between focal length and depth of field that most “grand scenics” are taken with wide angle lenses.
|
Aperture/ |
f 5.6 |
f 8 |
f 11 |
f 16 |
f 22 |
|
18 mm |
9.89 |
6.99 |
4.94 |
3.50 |
2.47 |
|
24 mm |
17.6 |
12.4 |
8.79 |
6.22 |
4.40 |
|
28 mm |
23.9 |
16.9 |
12.0 |
8.46 |
5.98 |
|
35 mm |
37.4 |
26.4 |
18.7 |
13.2 |
9.35 |
|
50 mm |
76.3 |
54.0 |
38.2 |
27.0 |
19.1 |
|
60 mm |
110 |
77.7 |
54.9 |
38.9 |
27.5 |
Hyperfocal Distance in feet for APS-C sensor
ISO, the “other” exposure parameter. The term ISO references the standard by which we measure the light sensitivity of film or a digital sensor. In theory, the higher the ISO, the more sensitive the film or sensor is to light. However, selecting a higher ISO on a digital camera doesn’t really make the sensor more sensitive to light, it just increases the amplification of the light hitting the sensor, thus making the final image look brighter.
In effect, when you bump up the ISO you are telling your camera’s internal circuitry (or software) to amplify an otherwise dark image coming from your sensor. The advantage is that you can use faster shutter speeds in order to reduce motion blur, while still having an acceptably bright image. The disadvantage is that you are also amplifying the electronic “noise” in your cameras circuitry at the same time. This “noise” will appear as random colored pixels throughout the image. Most cameras use built in noise reduction software in an attempt to reduce this image noise; however, this noise reduction software will also reduce the fine detail in the image. You should shoot at the lowest ISO sufficient to achieve shutter speeds fast enough to stop motion blur in your image.
“Contrast-based” exposure techniques. You should adjust your exposure techniques based on the contrast of the scene. The more challenging high contrast scenes require different techniques than lower contrast scenes. You should also adjust your techniques based on whether the scene is static or dynamic (are your subject and lighting fairly stable, or are they changing rapidly). Use the following guidelines for adjusting your exposure techniques:
- High contrast scene:
o Static scenes: Manual Exposure & Spot (partial) meter on highlights where you want to maintain visible detail, setting the exposure on your camera’s exposure scale at +2 EV
o Dynamic scenes: Aperture or Shutter Priority (Av or Tv,) matrix meter and set exposure compensation based on histogram/blinkies
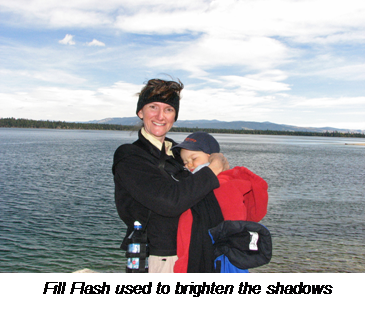
o Use fill-flash to fill in shadows in high contrast scenes.
· Set your exposure to keep the background from blowing out and let the flash fill in the shadows
· Use the fastest shutter speed that will work with your flash and a wide aperture to maximize the effects of fill flash

- Moderate contrast scene:
o Static scenes: Manual Exposure and spot (partial) meter on mid-tones, setting the exposure on your camera’s exposure scale at “0” (Zone V, mid-tones)
o Dynamic scenes: Av or Tv, matrix meter and set exposure compensation based on histogram
Practice these techniques and ask questions on the Spirit of Photography forums and you will see a definite improvement in your images.